AI assisted image
A wine cooler is more than a temperature-controlled cabinet. In the home, it is also a sound source that starts, stops and changes character throughout the day. In a quiet kitchen or an open living space, a low hum, a tonal fan sound or a short vibration at compressor start-up can become surprisingly noticeable. As wine coolers move closer to where people live, eat and relax, silence stops being just the absence of sound and becomes part of the comfort and quality the user actually experiences.
This is not only a design consideration. Under the EU energy labelling framework for refrigerating appliances, including dedicated wine storage units, manufacturers must declare airborne acoustic noise emissions (in dB(A)) and a noise emission class (A–D) on the energy label. That gives acoustic performance a second reason to be treated as a design parameter from the outset, rather than a final troubleshooting exercise.
Where does wine cooler noise come from?
The exact noise profile depends on the cooling architecture, component selection and cabinet design, but most compressor-based wine coolers share a few common sources.
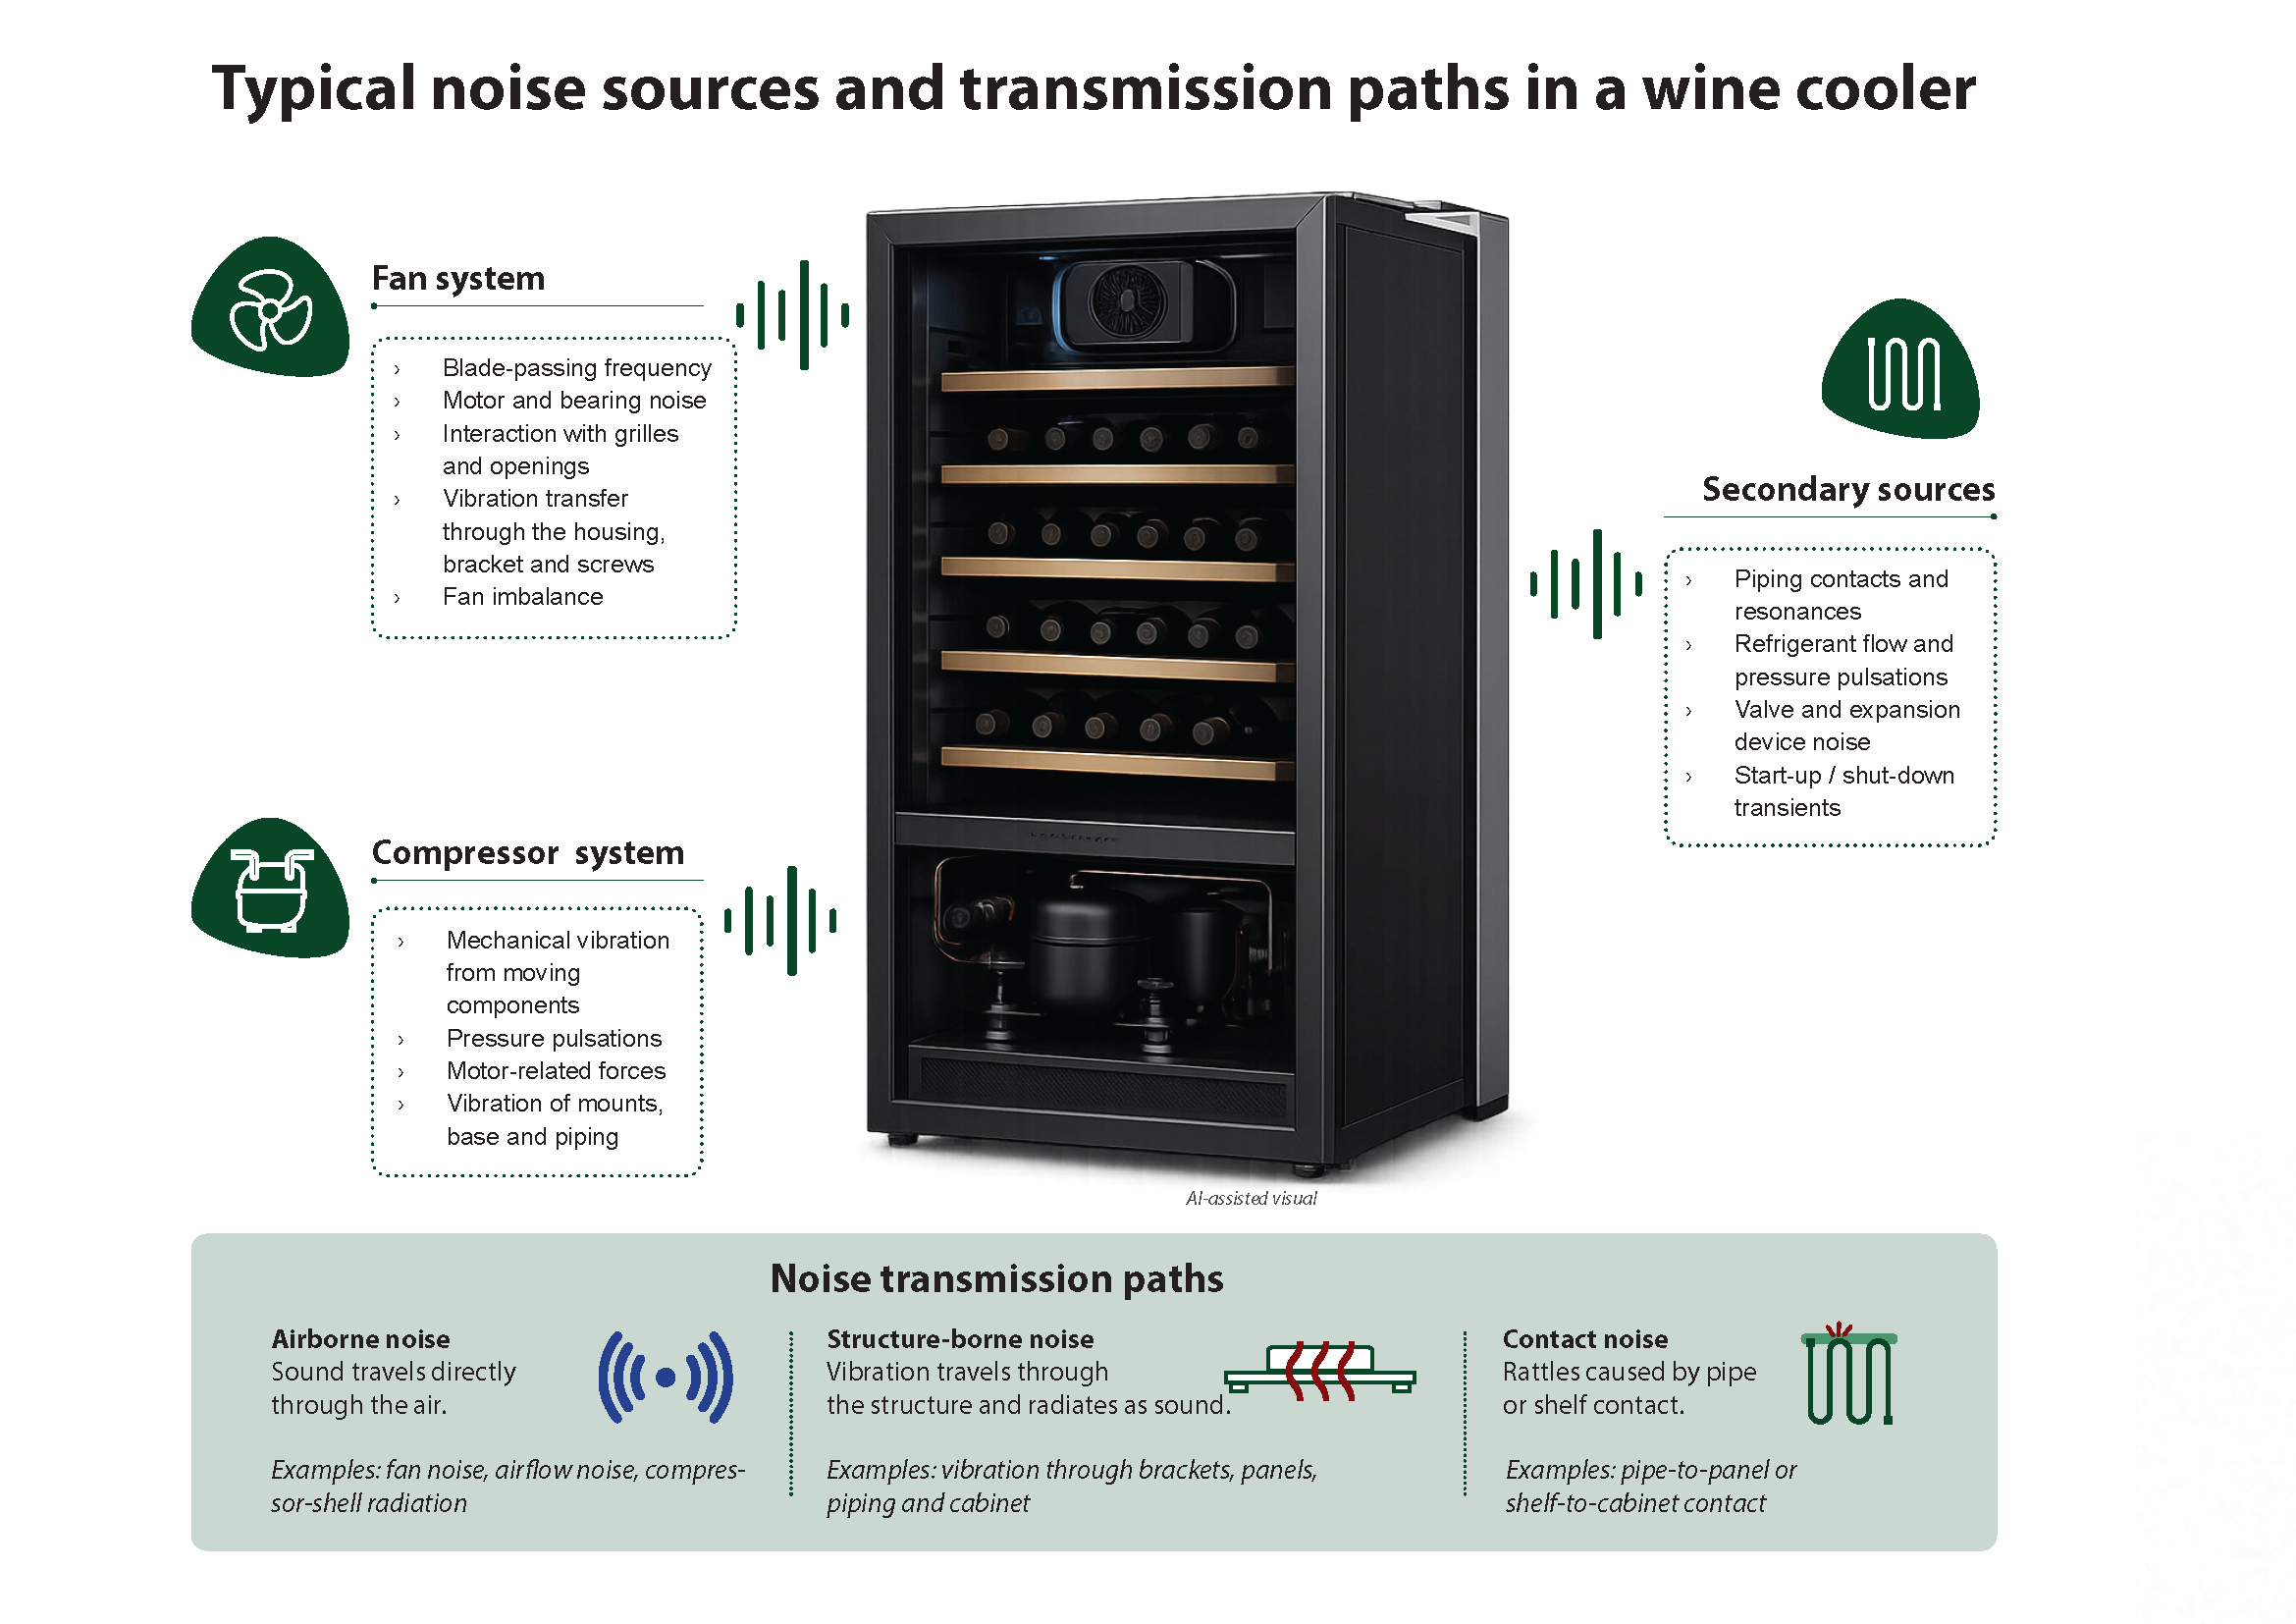
The fan system
Fans circulate air through the cabinet or across heat exchangers, and generate airborne sound through blade-air interaction, turbulence around inlets and outlets, and motor or bearing behaviour. The installed environment matters too: restricted airflow, sharp transitions or nearby grilles can increase turbulence and change the acoustic character. Just as important is the fan mounting. Even when airborne fan noise is low, vibration from the motor can transfer through the fan housing, bracket, screws and cabinet structure, exciting the cabinet panels so they radiate sound into the room as structure-borne noise.
The compressor system
The compressor, usually in the lower mechanical compartment, can generate both airborne and structure-borne noise from mechanical forces, refrigerant pressure pulsations, valve movement and shell vibration. Rubber grommets or other resilient mounts are normally used to isolate it, but a soft material does not automatically guarantee effective isolation; its stiffness, geometry, load and temperature behaviour all affect how much vibration reaches the cabinet. Refrigerant tubing can also create its own transmission path if a tube contacts a panel or bracket directly, bypassing the intended isolation.
Refrigerant flow and secondary noises
Depending on the system and operating condition, users may also notice refrigerant flow and pressure pulsations, expansion-device noise, contact between pipes or panels, loose shelves or bottle supports, and short clicks during start-up or shut-down. These sounds are often modest in level but draw attention because they are tonal, irregular or unexpected.
Airborne and structure-borne noise need different solutions
Airborne noise travels directly from a component through the air, such as aerodynamic fan noise or sound radiated from the compressor shell. Structure-borne noise begins as mechanical vibration that travels through brackets, screws, panels or pipes before another surface radiates it as audible sound. The distinction matters in practice: a material that absorbs airborne sound may do little for a rigid vibration path, and adding mass or absorption around a component will not fix a poorly isolated bracket. Identifying which mechanism is dominant, and where, is the first step toward an effective fix.
Why acoustics should be considered early
When acoustic requirements are introduced at the concept stage, the development team still has a wide solution space available: fan diameter and airflow path, compressor location, bracket geometry, pipe routing, mounting points, material thickness and cabinet-panel resonances can all still be influenced. Once tooling, cabinet geometry and the thermal system are fixed, the room left for acoustic countermeasures shrinks quickly, and late-stage changes tend to introduce new compromises: an enclosure can restrict airflow, a softer mount can allow excessive movement, and added mass affects cost and handling.
For this reason, acoustic optimisation is best treated as a system-development activity, one that considers the source, the transmission path and the receiving structure together, rather than a single material-selection task at the end.
A practical development process
- Define the target: set clear objectives such as noise-emission class, sound-power targets and user-comfort expectations.
- Test across operating modes: evaluate start-up, steady operation, fan activity, temperature recovery and shut-down.
- Measure and identify: use acoustic and vibration measurements to locate the main sources and transmission paths.
- Develop targeted solutions: address the source (fans, compressors), the transmission path (isolation, brackets, pipe routing) and the receiving structure (panels, damping).
- Validate at system level: confirm acoustic performance alongside thermal behaviour, durability and manufacturing tolerances.
It is also worth remembering that dB(A) is not the whole story. Products with a similar overall sound level do not necessarily sound equally quiet: tonal noise, fluctuations, rattles and transient events all shape how comfortable a product feels to live with.
From investigation to validated solution: a fan bracket example
In one wine-cooler development project, vibration from the fan was transferred through the mounting bracket, screws and cabinet structure into the room. The baseline configuration had the bracket mounted directly to the cabinet.
Introducing a single 8 mm layer of standard EPDM foam between the bracket and the cabinet reduced the measured noise level by approximately 3.2 dB(A). Replacing the EPDM foam with a single 8 mm layer of VibraFlex® VF28, a material specifically developed for vibration isolation, increased the noise reduction to approximately 5.3 dB(A).
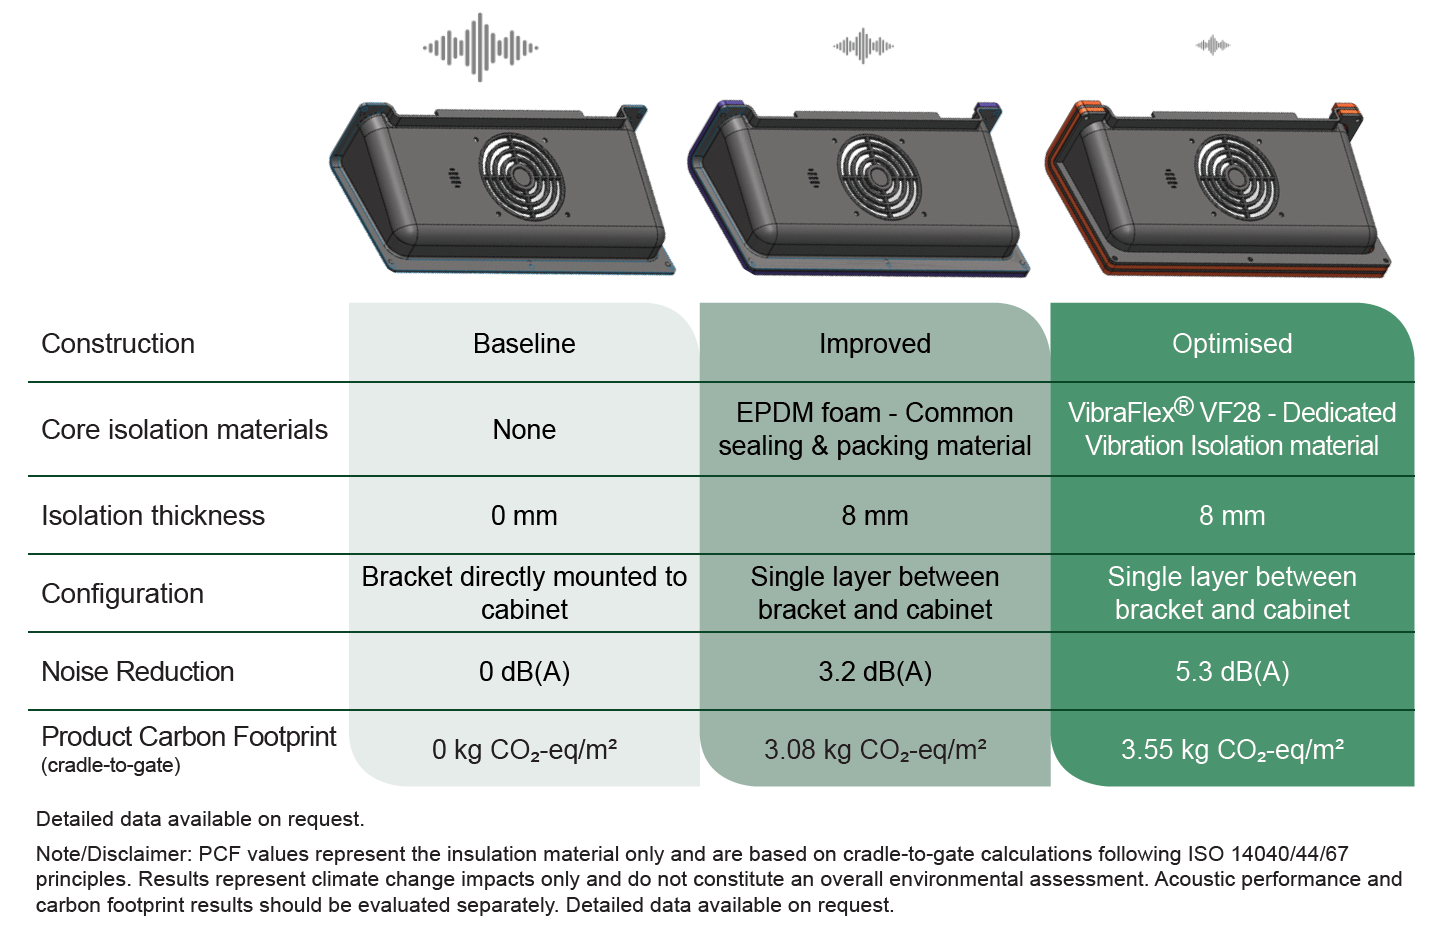
The case illustrates a broader point: the complete mounting system, including material properties, isolation thickness, screw connections and bracket geometry, needs to be considered as a whole. Selecting a material specifically designed for vibration isolation can significantly improve performance without increasing the required installation space.
Designing for quietness from the start
Effective acoustic development means understanding the source, the transmission path and the structure as one system, and starting that work early enough that quietness becomes part of the product architecture rather than a late correction. At BPI, this work combines noise and vibration testing, material expertise and prototype validation, supporting both new product development and the optimisation of existing wine-cooler designs. By identifying where vibration transfer actually occurs, isolation concepts can be tailored to the available space, load conditions and required acoustic performance, so that quietness is designed in, not added afterwards.
Contact one of our employees for more information
-
Stephanie Bertalsen
- Key Account Manager
-
sbe@bpi.dk
-
+45 30 66 88 11
-
Henning Tholund
- Key Account Manager
-
hth@bpi.dk
-
+45 25 42 84 49